Tuesday, May 1, 2018

Cookie Number Cake

Cookie Number Cakes are all over Pinterest and Instagram. This was my first attempt. I used two batches of a classic chocolate sugar cookie recipe. It worked best to roll the dough out on parchment paper to transfer to the baking sheet. 

Topped with Target Raspberry cookies, sugar wafers, extra chocolate star cookies, Chocolate gems, Chocolate candy animals (made from custom molds), Happy Birthday chocolates, Whoppers, Pink Sixlets and bright licorice bits. The frosting was two batches of classic butter cream. 

Assembly, a few blobs of frosting under the bottom layer to secure it to the base. I used a Wilton #1 tip to make large dollops of frosting. Then I let the frosting set for about a half hour before adding the next cookie layer. Placed the second cookie on the set frosting. Then repeated the frosting dollop technique. Again, I let it set for half hour before placing on the toppings. 

We didn't even eat the cookie cake. I brought it to work. We had more than enough extra cookies from all my experiments. It's my birthday, all I wanted to do was successfully make this cake. Mission accomplished! 


Sunday, August 28, 2016

1000 Paper Cranes


It is said that if you make 1,000 千羽鶴 Origami Paper cranes are you granted a wish by the Gods. Still other stories believe you are granted eternal good luck, instead of just one wish, such as long life or recover from illness or injury. Either way, I am going for it. It's soothing and a bit meditative.

In Japan, the crane is one of the mystical or holy creatures and is said to live for a thousand years. In some stories it is believed that the 1000 cranes must be completed within one year and they must all be made by the person who is to make the wish at the end.

The 1000 Origami cranes were popularized through the story of Sadako Sasaki, a Japanese girl who was 24 months old when she was exposed to the radiation from the atomic bombing of Hiroshima during WWII. At the age of 12, Sadako developed leukemia. After spending significant time in the hospital, Sadako began folding cranes with the legend in mind. She folded only 644 before she became to weak to fold anymore. In her honor, her classmates folded the rest for her.  There is another version of the story, that she did in fact fold nearly 1,400 cranes. In 1958, a statue of Sadako holding a golden crane was unveiled. Every year on Obon Day, people leave paper cranes to remember the departed spirit's of one's ancestors. 

Saturday, January 2, 2016

Big Magic

"By completely absorbing our attention for a short and magical spell, it can relieve us temporarily from the dreadful burden of being who we are. Best of all, at the end of your creative adventure, you have a souvenir–something that you made, something to remind you forever of your brief but transformative encounter with inspiration.

Art is a crushing chore and a wonderful priviledge. - Elizabeth Gilbert"

I loved this book. When reading, it felt like Elizabeth was just sitting with me on my couch chatting about life. It was a quick read and something that I will reference on days when my designer magic is running low.


Saturday, December 26, 2015

Winky Pillow


I finally made time to finish up many pillows for the kid's basement hangout. The Minnesota Principal Hot Dishes by Regions is a kitchen towel turned into a pillow (keeping the faye). The black & khaki Minnesota pillow was previously a tote bag that I purchased at Target. And the winky circle pillow was an all new creation–just a little something that has been stirring in my mind.

Wednesday, December 23, 2015

Frosted Sugar Cookies

 Every holiday season, I made plates of my Great Grandma Marie's Famous Frosted Sugar Cookies to sell to friends, families and fans. This year, I sold 45 plates of Frosted Sugar cookies! OMG. Every year I get a bit faster at making them. And this year I pulled in the Dala horse as the new house favorite. I need to shake up the routine.

Dala horse cookies are my new holiday favorite!


 Custom Hanukkah cookies for a good friend.


Friday, December 18, 2015

PS4 Controller Custom Cookie

Recently I made custom PS4 Controller Frosted Cookie for Best Buy. Here is my little how to.

There was much improvising that happened and many attempts that did not fully work. Above is the best version and below is how to make your own.

Tools needed:
Sugar Cookie dough (homemade or store bought)
Black frosting (homemade or store bought)
PS4 template (I traced a controller and hand cut out the cookies)
Black Fondant (Cake Boss brand works well) rolled to 1/4 thickness
Tootsie Crows Licorice Gumdrops (found some at Walgreens)
Rolling pin
Medicine cup (to cut out the buttons)
Pen cap (to cut out the buttons)
Elmers or any gluestick brand cap (to cut out the buttons)
Toothpick (to make the textured dots)
Frosting for the symbols (pink, red, light blue and green)

1. Roll out your cookie dough, cut the cookies and then bake them according to the directions
2. Once the cookie is cool, frost it with the black frosting
3. Cut out the controller buttons

Controller parts from left to right:
Left:
Cut one medicine cup circle in the black fondant + hand cut arrows. "glue" them with the black frosting.

Middle top:
Cut one rectangle roughly 2" wide by 1.25" tall in the black fondant. Poke with toothpick to achieve the texture.

Middle bottom:
Cut two circles cut with the glue stick cap in the black fondant, place two Tootsie Crow Licorice Gumdrops on top. I sliced the Gumdrop in half so they were not too tall. For the middle button, cut one of the green pen caps in the black fondant. Again use the black frosting as "glue".

Right:
Cut one medicine cup circle in the black fondant. Cut four circles with the green pen cap in the black fondant. Use the black frosting as "glue" to assemble. Then use pink, green, red and light blue frosting to draw the symbols on the small circles.

Allow the cookie to air dry for a few hours before sealing in a container. This will allow the frosting to "set". 

I'll be honest, they are a lot of work. But I already figured out how to make it come together. Now it's just effort that will make it happen!

If you made it to the bottom of this post, click this link and go "like" the custom PS4 Cookie I made for Best Buy!

Wednesday, November 25, 2015

Spicy Mexican Chocolate Pumpkin Pie

I found this recipe in Better Homes & Gardens but I gave it a bit of spin after a few rounds of making it. The texture of the chocolate pumpkin layer has a French Silk Pie texture. And the heat from the chili powder and cayenne pepper gives it a nice bit of zing. It's my new favorite. Cold pie spicy chocolate pie with some hot coffee, yes please!

Spicy Mexican Pumpkin Pie:

1 Frozen Deep dish Pie Crust
1 3.1 oz disc of Mexican Chocolate (I found Nestle Abuelita Mexican Chocolate at Cub Foods)
2 TBSP butter
3/4 cup packed brown sugar
1 tsp pumpkin pie spice
1/4 tsp salt
1/4 tsp mild chili powder (I use 1/2 tsp regular chili powder)
1/8 tsp cayenne pepper (I use 1/4)
1 15 oz can pumpkin
4 eggs, lightly beaten
1 cup half and half
1 recipe for Chocolate Ganache (see below)

Prepare the piecrust, set aside to cool.

Preheat over to 350. In a small saucepan heat the chocolate disc and butter over medium-low heat, stirring constantly, just until melted. Set aside to cool. In a large bowl combine brown sugar, pumpkin pie spice, salt, chili powder, and cayenne pepper. Stir in pumpkin and eggs until combined. Gradually stir in half-and-half until combined.

Stir 1 1/2 cups of the pumpkin mixture into the cooled chocolate mixture. Pour into the piecrust. Then pour the remaining pumpkin mixture over the chocolate layer. Cover the edges with foil. Bake 60 minutes or until edges are puffed and the center appears set. Cool on wire rack. Chill within 2 hours.
Spoon Chocolate Ganache over top.

Chocolate Ganache:
3.1 oz chopped semisweet chocolate and 1/4 tsp cinnamon. In a small saucepan, bring 1/4 cup whipping cream to simmering, pour over chocolate. Let stand 5 minutes. Stir until smooth.

When ready to serve top with shaved chocolate and chili powder to your liking.


Tuesday, November 17, 2015

show me, don't tell me

The pretty pink lady is my Grandma Marvel. She was the kindest person I ever knew. She didn't say one bad thing about my Grandpa except once... "He thinks he is so smart, but sometimes he isn't". All around the world, times have been very trying. It makes me wonder what she would have to say about all of this. I like to think she say "The world is filled with nice people, if you can't find one, be one".

Nothing better than the 1980s Halloween costumes. I don't know why they haven't been reissued. Of course I had the Princess costume in previous photos!

Wonder where this all started from? click here.  I was asked by a few folks if I sell these images. I just started up a Society6. Check it out if you might be interested in a print or two.

Wednesday, September 9, 2015

Banana Egg Pancakes


Banana Egg Pancakes. (Gluten Free, Whole30 Compliant, Paleo and delicious)

2 eggs
1 banana
1/2 tsp Baking Powder
1/2 tsp Cinnamon

Directions:
Peel the banana, slice it then smash the banana down to a puree like texture. Crack two eggs into another bowl, whip them up nicely. Combine egg with banana, then add the baking soda and cinnamon. Heat up coconut oil in a small frying pan on medium heat. Pour approximately 1/3 cup pancake mixture per pancake. It makes 3-4 pancakes.

Thursday, August 27, 2015

Baked Donuts

For years, I have intended to make baked donuts. Finally, this week I bought a mini donut pan at TJMaxx and went for it. They are freaking awesome. So easy to make and the kids loved them. The chocolate donuts were fantastic. Next up Apple Cinnamon and then maybe Green Tea with toasted coconut.

Chocolate Donuts (Makes 12 donuts- I would just double the recipe if you have kids in the house)
combine in a medium bowl
1 cup flour (you could easily use GF flour)
1/2 sugar
1/4 cup cocoa powder
1/4 cup mini chocolate chips
1/2 tsp baking soda

combine in small bowl
1/2 tsp  vanilla extract
1 egg
6 TBS sour cream
1/4 cup milk
1/4 vegetable oil (or coconut oil)

Pre-heat the oven to 375 degrees. Mix the dry ingredients together in a medium bowl, combine the wet ingredients in a small bowl, then add the wet ingredients to the dry. Grease the donut pan, then evenly fill the pan. Bake for 8 minutes or until the tops spring back upon touch.

Let the donuts cool in the pan a bit before removing. Meanwhile make the chocolate glaze.

Chocolate Glaze (enough for 24 donuts, so you should just double the donut recipe!)
1/3 cup unsalted butter
1/4 cup whole milk, warmed
1 TBS light corn syrup
2 tsp vanilla extract
4 ounces bittersweet chocolate chopped
2 cups powdered sugar (I don't bother sifting, but it's probably a good idea)

Combine the butter, milk, corn syrup and vanilla in a medium sauce pan or medium heat until the butter has melted. Decrease the heat to low, add the chocolate and whisk till melted. Turn off heat, add the powdered sugar and whisk till smooth. Place the mixture over a bowl of warm water and dip the tops of the donuts immediately. Take one donut at a time and carefully submerge the top, lift out of the glaze, flip over and allow to cool on waxed paper or a wire rack. Allow the glaze to set for 30 minutes before serving. I love sprinkles, so of course I add sprinkles before the glaze sets.


Tuesday, August 18, 2015

GF Carrot Cake with cream cheese frosting

I cannot get enough of this Gluten Free Carrot Cake with homemade Cream Cheese frosting.
It takes a bit of work to make but it is worth the effort.

I have had a few requests for the recipe, so it's time to share. 

Gluten Free Carrot Cake
2 eggs (room temperature)
1/2 cup brown sugar
1/2 raw sugar (I used coconut sugar)
1/2 cup butter (melted)
1 tsp vanilla
zest of one orange

combine then add to the mix:
1 1/2 All purpose Gluten Free flour (I like Trader Joe's best)
1 tsp baking powder
1/2 tsp ground ginger
1/2 tsp nutmeg
1/4 tsp cinnamon
1/2 tsp salt

combine then add to the mix:
2 cups shredded carrots
1 peeled and grated apple
1/2 cup chopped green grapes
juice of one orange

Stir in:
1/2 cup chopped walnuts (my kids are allergic to all nuts. So this can't happen at our house)

Grease and flour cake pans. Makes two thin layers. Bake at 375 for 25 minutes. 

Frosting:
16 oz cream cheese (softened)
8 Tbsp butter (softened)
1 cup powdered sugar (I went without this and it's great)
1 Tbsp vanilla

Garnish with more orange zest!

If you make mini cupcakes bake 10 minutes. For regular sized cupcakes, bake 18-20 minutes.


Sunday, August 16, 2015

DIY Rice Bag Wall Hanging

My Grandparents owned an International grocery store on Nicollet Island, Minnesota in the 1960 through the early 1980's. It was called International House of Foods. They had the first Fortune Cookie Machine west of the Mississippi. How sweet is that story? I remember helping to make fortune cookies and riding the big freight elevator.

My mom was cleaning out her house about a year ago. We found a few of my Grandma Marvel's branded rice bags. I was going to make them into pillows but decided I would rather have some wall hangings. I sewed a little channel for the dowels (from Michaels). I painted them with Hand Made Modern Glow-in-the-dark paint in Clementine. Then added a few neon pom poms for flair.

I am hanging up this sassy rice bag near a giant poster with some neon orange lettering. I am still working on styling up this room. Maybe some photos later?

Saturday, August 8, 2015

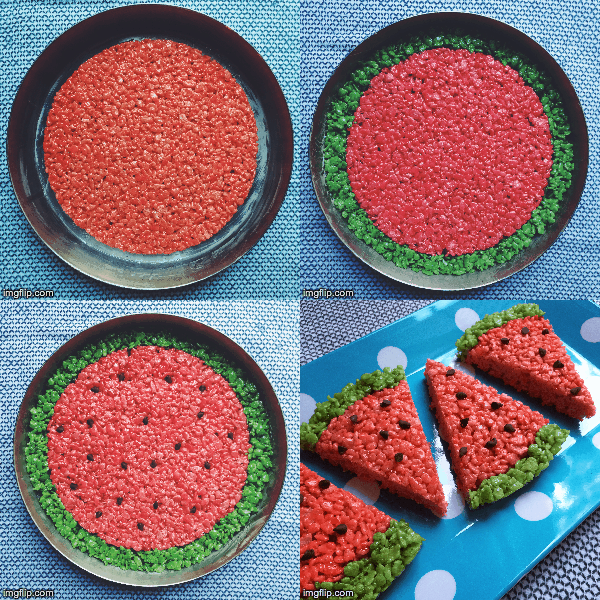
Watermelon Rice Kripies


Watermelon Rice Krispie Treats. I promise this is easy. The pretty treats above were created by seventh graders.

You will need:
Rice Krispies
Butter
Mini marshmallows
Vanilla extract
Red food coloring
Green food coloring
Mini chocolate chips
Small circular cake pan
Slightly larger circular cake pan

Recipe for Rice Krispies:
3 TBLS of butter
4 cups of mini marshmallows
5-6 cups of Rice Krispies (I lean toward 5, to ensure there is enough marshmallow goodness)
1 tsp of vanilla extract (I add this, the classic recipes does not have this)

We ended up making two watermelons and a bit extra of just plain green Rice Krispie bars (they would make great Minecraft Creeper Treats). For the first batch of Rice Krispies, melt the butter, marshmallows completely, then add the red food coloring. Next add the Rice Krispies. Let this mixture cool a tiny bit, then press into a small cake pan. Be sure that the pan is coated nicely with some butter. I find it easiest to really butter up your hands and press the treats in the pan.

While the red Rice Krispies are cooling a bit, mix up the green Rice Krispies. Butter two slightly larger cake pans, flip the red Rice Krispies into this larger pan. Then add the green Rice Krispies around the red Rice Krispies. Let it cool a bit more, then add the mini chocolate chips. If the treats are too hot the mini chocolate chips will melt, so be patient.

We are thinking of making oranges, lemons and limes next!

Monday, July 20, 2015

Swim Ribbon Display


I have three kids in competitive swimming. Soon we will be wrapping our third year of schlepping kids to pools nearly everyday, driving carpools, writing swim events on arms with Sharpies, Goggle management, sitting through four+ hour long swim meets, long-term screaming parents (not me, they can't hear us- trust me, I asked) and fun foods like Walking Tacos and Giant Dill Pickles from Costco. We get two weeks off around December and in March. The month of August is also a swim team free zone. Otherwise we go all year long. Most friends think we are insane.

"OMG- I swear you are pool-bound every weekend"

The kids need swimming. When they don't swim the month of August, they are climbing the walls, getting in trouble and breaking things. Yes, they are generally good kids. Kids are kids, they have a ton of energy. Swimming is the perfect thing for them. I love the sport because it is a team thing (Relays) and an individual thing (Personal Best times). There are swimming brackets based on age. So the kids need to learn to focus in order to achieve goals before they age up. Swimming is something you can do till you are in your 90s. At a recent swim meet, a Master Swimmer in her 90s swam at the meet. (I am totally serious).

And the best part? RIBBONS and MEDALS.

"OMG- How many ribbons do you have at your house? You should do a Project Runway inspired dress made from those ribbons"

"You could make a quilt from all of those ribbons"

So each kid had their own ribbon bin under their bed. The bins were filling up and I wanted to create something to hang them on the wall. I found a few ideas on Pinterest and on Etsy, but I wanted something that held MORE RIBBONS.

I bought the boards at Home Depot (approximately 48" x 12"), we painted them white (Semi-gloss), added 30+ white coffee cup hooks (again from Home Depot), then hand-painted the lettering. I wanted one saying to go across all three boards. I designed the saying on my computer, printed it out on letter sized paper, spliced it together and then traced it on the wood (pressing hard with a ball-point pen), then painted the words with a gray paint. This hand-painting took a while. It was a pain, so if you go for it be patient.

We placed the Ribbon Displays in the stairwell on the way to the kids Basement-zone. Now, after a meet they run down there to proudly hang up their ribbons. At the top, is my Daughter's ribbon display. She currently has the most ribbons. The middle child is catching up with her. And rounding out the bottom, is my little guy's ribbon board. He has only been swimming for a year. 

 12 year old kid to give a sense of scale.

Saturday, June 20, 2015

Fruit Cake

For weeks and weeks I was pinning Fruit Cakes on Pinterest. And now, here it is! Layers of watermelon, with melon cubes in between and topped with kiwi, peaches, blueberries. I added kabob skewers to hold everything together. This fruit cake puppy went for car ride to a friends' party and everything was just fine.

I wanted to try the version with coconut cream frosting slathered with sliced almonds. That will happen. Stay tuned.